

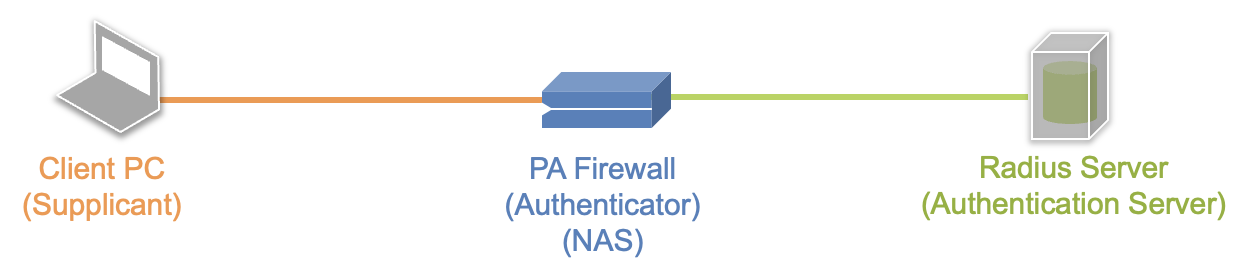
PAとのRADIUS連携のために、CentOS7上にFreeRADIUSを構築した際のメモです。
- 前提条件として、CentOSをminimalでインストールしておきます。
- 以下2点の動作確認を行います。
- PAP(平文)によるRadius認証
- PAシリーズのRadius Server Profileのデフォルト設定になっているpeap-mschapv2認証
- 検証用のためセキュリティ面などは一切考慮していません。
- SELinuxやFirewalldは無効化しています。
- rootで作業しています。
FreeRADIUSのインストール
- アップデート
yum -y update- freeradiusとテスト時に利用するfreeradius-utilsをインストール
yum -y install freeradius freeradius-utilsFreeRADIUSの設定(PAP認証)
- 設定する必要がある場所は以下2つです。
- /etc/raddb/users
- /etc/raddb/clients.conf
/etc/raddb/users ファイル
<ユーザ名> Cleartext-Password := “<パスワード>” 形式で指定します。attribute属性なども、このファイルに記述できます。(ベンダー固有のattribute属性(VSA)などを利用する場合はDictionaryファイルへの記述が必要です)
test-user-001 Cleartext-Password := "password123"
test-user-002 Cleartext-Password := "password123"
test-user-003 Cleartext-Password := "password123"
/etc/raddb/clients.conf
Radiusクライアントに関する設定を行います。Radiusクライアントとは、Radiusサーバと直接通信を行うデバイスのことで、Authenticator または、NAS(Network Access Server)と呼ばれます。clients.confファイルでは、アクセス可能なAuthenticatorのIPアドレスの指定と、Radiusサーバ通信時に利用するSecret(パスワード)を指定します。
PAシリーズはデフォルトでは認証等の管理系通信にMgmtポートを利用しますので、MgmtポートのIPを指定します。Mgmtポート以外のポートを利用する場合はService Route Configrationで変更可能です。
今回は、検証環境なので全IPを許可してしまいます。clients.confファイルの最後に以下を追加します。
client private-network {
       ipaddr          = 0.0.0.0/0                      # PAのIP。この設定を0.0.0.0/0 とすると全IPを許可
       secret          = testing1234                 # PAとRadius間の通信で利用するsecretパスワード(テストのため変更)
}
参考)
ローカル試験用の設定はlocalhostとしてデフォルトで設定されています。丁寧なコメント文が記載されているのでちょっと見にくいですがコメントを削除すると以下のような設定です。
client localhost {
        ipaddr = 127.0.0.1          # localhostからの接続を許可
        proto = *
        secret = testing123        # デフォルトのsecretパスワード
        require_message_authenticator = no
        nas_type         = other        # localhost isn't usually a NAS...
        limit {
                max_connections = 16
                lifetime = 0
                idle_timeout = 30
        }
}
Radius認証のテスト(PAP編)
まず、radtestを使ってローカルで試験を行います。
RadiusサーバをDebugモードで起動
Radiusサーバをデバッグモードで起動します。設定に問題がなければ”Ready to process request”と表示されますので、このままにして別コンソールで作業を行います。
[root@localhost ~]# radiusd -X
FreeRADIUS Version 3.0.13
Copyright (C) 1999-2017 The FreeRADIUS server project and contributors
There is NO warranty; not even for MERCHANTABILITY or FITNESS FOR A
PARTICULAR PURPOSE

<中略>

Listening on auth address * port 1812 bound to server default
Listening on acct address * port 1813 bound to server default
Listening on auth address :: port 1812 bound to server default
Listening on acct address :: port 1813 bound to server default
Listening on auth address 127.0.0.1 port 18120 bound to server inner-tunnel
Listening on proxy address * port 37122
Listening on proxy address :: port 37120
Ready to process requests
radtestによるローカルテスト
つぎに、別コンソールでRadiusサーバにssh接続して、radtestコマンドでローカル環境からのテストを行います。manを確認する限りNASポート番号は属性値(attribute)であり設定上の意味はないようなので、0〜2147483648(2^31)の間の適当な数字を入れてください(今回は0)。
radtest [-t pap/chap/mschap] <ユーザー名> <パスワード> <RADIUSサーバIP> <NASポート番号> <共有鍵>“Received Access-Accept” と表示されていれば接続テストは成功です。-tオプションを変更することでpap/chap/mschapそれぞれ試験することができます。
[root@localhost ~]# radtest -t pap test-user001 password123 localhost 0 testing123
Sent Access-Request Id 36 from 0.0.0.0:48348 to 127.0.0.1:1812 length 82
	User-Name = "test-user001"                 # usersに設定したユーザ名
	User-Password = "password123"          # usersに設定したパスワード
	NAS-IP-Address = 127.0.0.1                  # client.confで許可されたIP
	NAS-Port = 0
	Message-Authenticator = 0x00
	Cleartext-Password = "password123"
Received Access-Accept Id 36 from 127.0.0.1:1812 to 0.0.0.0:0 length 20
radtestによるリモートテスト
今度は、ネットワーク経由でのテストをしてみましょう。freeradius-utilsをインストールした別サーバにログインします。RadiusサーバのIPを指定して再度radtestを実行します。clients.confに設定したprivate-networkの設定ではsecretはtesting1234としていましたので注意してください。
[root@localhost ~]# radtest -t pap test-user001 password123 <RADIUSサーバIP> 0 testing1234
Sent Access-Request Id 179 from 0.0.0.0:34190 to <RADIUSサーバIP>:1812 length 82
	User-Name = "test-user001"
	User-Password = "password123"
	NAS-IP-Address = 127.0.0.1
	NAS-Port = 0
	Message-Authenticator = 0x00
	Cleartext-Password = "password123"
Received Access-Accept Id 179 from <RADIUSサーバIP>:1812 to 0.0.0.0:0 length 20
このように、いくつかの設定ファイルを変更するだけで簡単にRadiusサーバを利用することができます。
FreeRADIUSの設定(peap-mschapv2編)
続いて、PAのRadius server profileのデフォルト設定であるpeap-mschapv2を利用した認証試験を行います。基本的な設定は上記のままでOKですが、peapではeap通信をTLSにより暗号化していますので、追加で証明書の作成やそれに関連する設定が必要になります。
- 今回、設定するファイルは以下の5つですが、デフォルト設定のままでも動作すると思います。
- /etc/raddb/certs/ca.cnf
- /etc/raddb/certs/server.cnf
- /etc/raddb/certs/client.cnf
- /etc/raddb/mods-enabled/eap
- /etc/raddb/sites-available/tls
事前準備
まず、フォルダ内にデフォルトで配置されている証明書類を削除します。
rm -f *.pem *.der *.csr *.crt *.key *.p12 serial* index.txt*削除後、ルート証明書、サーバ証明書、クライアント証明書を作成します。FreeRADIUSにはMakefileが準備されていますので、ca.cnf、server.cnf、client.cnfのファイルを修正してmakeコマンドを叩くだけで証明書が作成できます。
ca.cnf
ルート証明書に関する設定です。デフォルト設定でも問題なく動作しますが、有効期限とCommonNameだけ修正しておきます。
[ CA_default ]
default_days 	= 1000       #デフォルトの有効期間が60日なので1000日に修正

[certificate_authority]
commonName 	= "My Private Root Certificate"        # ルート証明書としてPCへインストールする際に分かるように名前を変更
makeコマンドを利用してルート証明書を作成します。
[root@localhost certs]# make ca.pem
make[1]: Entering directory `/etc/raddb/certs'
make[1]: Leaving directory `/etc/raddb/certs'
make[1]: Entering directory `/etc/raddb/certs'
make[1]: Leaving directory `/etc/raddb/certs'
openssl req -new -x509 -keyout ca.key -out ca.pem \
	-days '1000' -config ./ca.cnf
Generating a 2048 bit RSA private key
.......................................................+++
......................+++
writing new private key to 'ca.key'
-----
server.cnf
サーバ証明書に関する設定ファイルです。これもデフォルト設定で問題なく動作しますが、有効期限とCommonNameだけ修正しておきます。サーバ証明書はGoogle Chromeの825日問題を考慮して824日としていますが、このサーバ証明書はブラウザではなくNASが検証しますのでおそらくこの制限には当たりません。
[ CA_default ]
default_days		= 824       #デフォルトの有効期間が60日なので824日に修正

[server]
countryName			= FR
stateOrProvinceName	= Radius
localityName			= Somewhere
organizationName		= Example Inc.
emailAddress			= admin@example.org
commonName		= "My Server Certificate"
makeコマンドを利用してサーバ証明書を発行します。
[root@localhost certs]# make server.pem
openssl req -new  -out server.csr -keyout server.key -config ./server.cnf
Generating a 2048 bit RSA private key
...+++
......................+++
writing new private key to 'server.key'
-----
openssl ca -batch -keyfile ca.key -cert ca.pem -in server.csr  -key 'whatever' -out server.crt -extensions xpserver_ext -extfile xpextensions -config ./server.cnf
Using configuration from ./server.cnf
Check that the request matches the signature
Signature ok
Certificate Details:
        Serial Number: 1 (0x1)
        Validity
            Not Before: Oct 10 21:23:15 2022 GMT
            Not After : Jan 11 21:23:15 2025 GMT
        Subject:
            countryName                     = FR
            stateOrProvinceName       = Radius
            organizationName             = Example Inc.
            commonName                   = My Server Certificate
            emailAddress                     = admin@example.org
        X509v3 extensions:
            X509v3 Extended Key Usage:
                TLS Web Server Authentication
            X509v3 CRL Distribution Points:

                Full Name:
                  URI:http://www.example.com/example_ca.crl

Certificate is to be certified until Jan 11 21:23:15 2025 GMT (824 days)

Write out database with 1 new entries
Data Base Updated
openssl pkcs12 -export -in server.crt -inkey server.key -out server.p12  -passin pass:'whatever' -passout pass:'whatever'
openssl pkcs12 -in server.p12 -out server.pem -passin pass:'whatever' -passout pass:'whatever'
MAC verified OK
client.cnf
クライアント証明書に関する設定ファイルです。クライアント証明書認証が不要であれば生成する必要はありません。同じくデフォルト設定でも問題なく動作しますが、有効期限とCommonNameだけ修正しておきます。
[CA_default]
default_days = 1000 #ルート証明書同様に1000日に修正

[client]
emailAddress = test-user@example.com       # クライアント証明書のファイル名になります。
commonName = test-user@example.com     # peap認証でログイン時、このcommonNameがユーザー名としてログに表示されます。
makeコマンドで証明書を作成します。
[root@localhost certs]# make client.pem
openssl req -new  -out client.csr -keyout client.key -config ./client.cnf
Generating a 2048 bit RSA private key
............+++
.....................+++
writing new private key to 'client.key'
-----
openssl ca -batch -keyfile ca.key -cert ca.pem -in client.csr  -key 'whatever' -out client.crt -extensions xpclient_ext -extfile xpextensions -config ./client.cnf
Using configuration from ./client.cnf
Check that the request matches the signature
Signature ok
Certificate Details:
        Serial Number: 2 (0x2)
        Validity
            Not Before: Oct 10 22:17:45 2022 GMT
            Not After : Jul  6 22:17:45 2025 GMT
        Subject:
            countryName               = FR
            stateOrProvinceName       = Radius
            organizationName          = Example Inc.
            commonName                = test-user@example.org
            emailAddress              = test-user@example.org
        X509v3 extensions:
            X509v3 Extended Key Usage:
                TLS Web Client Authentication
            X509v3 CRL Distribution Points:

                Full Name:
                  URI:http://www.example.com/example_ca.crl

Certificate is to be certified until Jul  6 22:17:45 2025 GMT (1000 days)

Write out database with 1 new entries
Data Base Updated
openssl pkcs12 -export -in client.crt -inkey client.key -out client.p12  -passin pass:'whatever' -passout pass:'whatever'
openssl pkcs12 -in client.p12 -out client.pem -passin pass:'whatever' -passout pass:'whatever'
MAC verified OK
cp client.pem 'test-user@example.org'.pem
出来上がったファイルを確認してみます。ルート証明書、サーバ証明書、クライアント証明書が複数の形式でファイルとして出力されています。
[root@localhost certs]# ls -l
total 148
-rw-r--r-- 1 root root    4408 Oct 11 06:23 01.pem
-rw-r--r-- 1 root root    4416 Oct 11 07:17 02.pem
-rwxr-x--- 1 root radiusd 2706 Oct  1  2020 bootstrap
-rw-r----- 1 root radiusd 1432 Oct 11 05:41 ca.cnf
-rw-r--r-- 1 root root    1834 Oct 11 05:43 ca.key			# ルート証明書の秘密鍵
-rw-r--r-- 1 root root    1749 Oct 11 05:43 ca.pem			# ルート証明書
-rw-r----- 1 root radiusd 1115 Oct 11 07:16 client.cnf
-rw-r--r-- 1 root root    4416 Oct 11 07:17 client.crt
-rw-r--r-- 1 root root    1058 Oct 11 07:17 client.csr
-rw-r--r-- 1 root root    1834 Oct 11 07:17 client.key		# クライアント証明書の秘密鍵
-rw-r--r-- 1 root root    2589 Oct 11 07:17 client.p12
-rw-r--r-- 1 root root    3652 Oct 11 07:17 client.pem		# クライアント証明書
-rw-r----- 1 root radiusd  424 Oct  9 07:19 dh
-rw-r--r-- 1 root root     234 Oct 11 07:17 index.txt
-rw-r--r-- 1 root root      21 Oct 11 07:17 index.txt.attr
-rw-r--r-- 1 root root      21 Oct 11 06:23 index.txt.attr.old
-rw-r--r-- 1 root root     115 Oct 11 06:23 index.txt.old
-rw-r----- 1 root radiusd 4548 Oct  1  2020 Makefile
-rw-r--r-- 1 root radiusd  145 Oct 11 07:17 passwords.mk
-rw-r----- 1 root radiusd 8444 Oct  1  2020 README
-rw-r--r-- 1 root root       3 Oct 11 07:17 serial
-rw-r--r-- 1 root root       3 Oct 11 06:23 serial.old
-rw-r----- 1 root radiusd 1121 Oct 11 06:23 server.cnf
-rw-r--r-- 1 root root    4408 Oct 11 06:23 server.crt
-rw-r--r-- 1 root root    1054 Oct 11 06:23 server.csr
-rw-r--r-- 1 root root    1834 Oct 11 06:23 server.key		# サーバ証明書の秘密鍵
-rw-r--r-- 1 root root    2581 Oct 11 06:23 server.p12
-rw-r--r-- 1 root root    3644 Oct 11 06:23 server.pem		# サーバ証明書
-rw-r--r-- 1 root root    3652 Oct 11 07:17 test-user@example.org.pem  # client.pemと同じもの
-rw-r----- 1 root radiusd  708 Oct  1  2020 xpextensions
/etc/raddb/mods-enabled/eap
証明書まわりの設定を行います。ここでは、各証明書や秘密鍵のパス登録や、証明書の秘密鍵パスワード(input_password/output_password)、CRLの設定などを行いますが、今回、証明書のパスやファイル名、パスワード変更も行っていませんので、デフォルト設定から変更する必要はありません。CRLのチェックだけ無効化しておきます。
tls-config tls-common {
                private_key_password = whatever			# 秘密鍵のパスワード
                private_key_file = ${certdir}/server.pem		# サーバ証明書(秘密鍵)のパス
                certificate_file = ${certdir}/server.pem		# サーバ証明書のパス
                ca_file = ${cadir}/ca.pem					# ルート証明書のパス
                dh_file = ${certdir}/dh
               check_crl = no                 # CRLのチェックを無効化
        <中略>
}
/etc/raddb/sites-available/tls
必要に応じてtls{ } 内で、各証明書やパスワードを指定します。今回、証明書のファイル名やパスワードは変更していませんのでデフォルトのままで問題ありません。
	tls {
		private_key_password = whatever
		private_key_file = ${certdir}/client.pem
		certificate_file = ${certdir}/client.pem
		ca_file = ${cadir}/ca.pem
		dh_file = ${certdir}/dh
		random_file = /dev/urandom
		fragment_size = 8192
		ca_path = ${cadir}
		cipher_list = "DEFAULT"
	}
Radius認証のテスト(peap-mschap編)
peapによる認証テストにはeapol_testツールを利用します。
証明書のコピー
pap認証で利用したradtestはpeapには対応していませんので、peapによる認証テストでは、TLS通信のためにRadiusサーバから送信されるサーバ証明書をクライアント側が検証する必要があります。そのためscpなどを利用して検証に利用するルート証明書(ca.pem)をRadiusサーバから前回radius-utilsをインストールした別サーバにコピーしておきます。
[root@localhost ~]# scp root@<RADIUSサーバIP>:/etc/raddb/certs/ca.pem ./
root@<RADIUSサーバIP>'s password:
ca.pem                                        100% 1749     2.7MB/s   00:00
[root@localhost ~]#
ここでは割愛しますが、クライアント証明書認証を行いたい場合は、client.crtとclient.keyもコピーしておきましょう。
eapol_testによるリモートテスト
radius-utilsをインストールした別サーバにログインします。証明書の保存されているディレクトリに移動してルート証明書の権限を変更します。(クライアント証明書をコピーしている場合は同様に実施してください)
[root@localhost ~]# ls -l ca.pem
-rw-r--r-- 1 root root 1749 10月 20 11:41 ca.pem

[root@localhost ~]# chmod 666 ca.pem

[root@localhost ~]# ls -l ca.pem
-rw-rw-rw- 1 root root 1749 10月 20 11:41 ca.pem
テキストエディタで以下のファイルを作成し、peap-mschapv2-test.confの名前でファイルを保存します。
network={
key_mgmt=WPA-EAP
eap=PEAP
identity="test-user-001"
password="password123"
phase2="autheap=MSCHAPV2"
ca_cert="ca.pem"
}
Radiusサーバが起動している必要があります。Radiusサーバ側で以下コマンドを入力して、デバッグモードで立ち上げます。
[root@localhost ~]# radiusd -X別サーバで、以下のコマンドを実行します。大量にログが出力されますが、最後にSUCCESSと表示されれば認証成功です。
[root@localhost ~]# eapol_test -a <RADIUSサーバIP> -c peap-mschapv2-test.conf -s testing1234
Reading configuration file 'peap-mschapv2-test.conf'
Line: 2 - start of a new network block
key_mgmt: 0x1
eap methods - hexdump(len=16): 00 00 00 00 19 00 00 00 00 00 00 00 00 00 00 00
anonymous_identity - hexdump_ascii(len=9):
     61 6e 6f 6e 79 6d 6f 75 73                        anonymous
ca_cert - hexdump_ascii(len=6):
     63 61 2e 70 65 6d                                 ca.pem
phase2 - hexdump_ascii(len=16):
     61 75 74 68 65 61 70 3d 4d 53 43 48 41 50 56 32   autheap=MSCHAPV2
Priority group 0
   id=0 ssid=''
Authentication server <RADIUSサーバIP>:1812
RADIUS local address: <RADIUSサーバIP>:42532

<中略> (大量のログが出力されます)

WPA: Clear old PMK and PTK
EAP: deinitialize previously used EAP method (25, PEAP) at EAP deinit
ENGINE: engine deinit
MPPE keys OK: 1  mismatch: 0
SUCCESS
[root@localhost ~]#
以上でFreeRADIUSの設定は終了です。